Domestic online store
Free shipping on e-commerce orders over 2000€
Fast delivery
Home
Customer account
Contact us
0
Shopping cart
Menu

LED SET for the top of the kitchen cabinet - HELMI TUNNELMA CCT 22W/m

In stock at
SKU#: KITCHEN22-SET-CCT-SMD

Ready-made LED strip set for your kitchen cabinet! The colour temperature adjustable HELMI TUNNELMA CCT 22W/m strip light is perfect for every kitchen or even utility room. At the touch of a button you can choose your preferred shade between 2500-6500K.

  • 2x2,5m aluminium profiles
  • 5 metre set on top of kitchen cabinets
  • 822 lumens / m
  • CCT, i.e. temperature adjustable 2500-5500K
  • Efficient ribbon for indirect lighting
Read more
from € 476.32
Add a comment to the order
Delivery methods
Free shipping for orders over to %s
Payment Methods
Pay safely with Credit/Debit Cards, Paypal and others.
Easy returns
Right of return for 14 days
  • Product description

    LED SETTI on top of kitchen cabinet - HELMI TUNNELMA CCT 22W/m

    The colour temperature adjustable HELMI TUNNELMA CCT 22W/m strip set is perfect for every kitchen or utility room. At the touch of a button you can choose your preferred shade between 2500-6500K.

    Includes

    The temperature adjustable HELMI TUNNELMA CCT 22W/m ribbon for kitchen cabinets includes:

    • 5 meters of 22W/m CCT led strip, 120 LEDs/m
    • a suitable power supply including a wireless Zigbee receiver
    • VaLO Zigbee series wireless push button (the button can be placed on the wall or kept detached, optional)
    • two surface-mountable aluminium profiles (length 2,5m per profile). Choice of several profiles.
    • 5 m 3-pole cable and 2 quick connectors (optional)

    About

    The luminous intensity of the 22/m tape is 822 lumens per metre. The base colour of the ribbon is white, but you won't see it, as it is always mounted on the aluminium profile that is always included and the 3M special tape on the LED ribbon ensures a good fixing to the profile. The led strip is 3mm thick, so very unobtrusive. The colour rendering of the Led strip is excellent at CRI93.

    Then there is the nasty bit, namely the corners and extensions. You see, the strip only has 15cm wires at each end as standard, so by cutting it at the relevant point (every 5cm), you get two strips. So if you want to cut more, you have to connect new wires to the copper points at the cut-off point. The CCT adjustable led strip uses three (3) pole wires: +, warm and cold. Package includes 5 feet of 3-pole cord and quick connectors to extend the cord to the transformer.

    The included transformer is also a Zigbee 3.0 receiver. This means you can connect the transformer to your smart home and control it with a Philips HUE or Smartthings system, for example. The transformer has screw connectors at both ends, so you can plug it in with a fixed or plug-in connector (included!) and the connectors can accommodate two wires from different LED strips. Product description of the transformer

    The wireless push button comes with a 3V battery and will last 1-3 years, depending on use. The button fits all frames using the 55m standard seamlessly.

    Installation

    The ribbon should be bonded to metal, such as an aluminium profile (supplied), to allow heat to dissipate away from the LED circuit. Proper cooling will prolong the life of the LED. Led tape does not bend laterally.

    Installation of the strip:

    1. Measure the mounting location
    2. Cut the profiles if necessary (with a scalpel or hacksaw) and the LED strip to the correct length (every 5cm from the cut-off point)
    3. Glue the LED strips to the profile on the table before fixing the profiles and press the covers into place.
    4. Screw the profile brackets to the bottom of the cabinet. 4-5pcs / 2,5m and snap the profiles on.
    5. Run the wires from the led strip to the transformer (hole in the grommets 7mm) and connect to the screw terminals.
    6. Put the plug in the wall and make a pairing between the button and the transformer.

    Pairing the button:

    1. Press the button on top of the transformer four (4) times in a row FAST. The Led strip will flash three times.
    2. Three times (3 LED's) light up three times (three times).Place the button next to the transformer (10cm)
    3. Press the bottom two buttons (S1 and S2) simultaneously for more than 3 seconds. The indicator light flashes rapidly
    4. Hold the button next to the transformer. The pairing takes about 10 seconds. The Led strip flashes three times when the pairing is successful.

    Pairing the transformer and the button Philips HUE or other Zigbee network:

    1. open "add a light" or similar in your app. The transformer can be found as a new lamp and you can control it with the app.
    2. Press the button on top of the transformer five (5) times in a row FAST. The Led strip will flash three times.
    3. open your app to "add a fixture" or similar.
    4. Press the bottom two buttons (S1 and S2) 3 times in a row.
    5. NOTE! The app will NOT CREATE ANYTHING! But the Green light on the button will flash rapidly 3 times, indicating that it is paired! So the button is connected to the Zigbee network, but it is not configured in the app!
    6. Press the button on top of the transformer 4 times in a row FAST. The Led strip will flash three times.
    7. Place the button next to the transformer (10cm)
    8. Press the bottom two buttons (S1 and S2) simultaneously for more than 3 seconds. The indicator light flashes rapidly
    9. Hold the button next to the transformer. The pairing takes about 10 seconds. The Led strip flashes three times when the pairing is successful.
    10. You can control from the button AND from the app

    If after the button pairing phase you can no longer control from the application, an error has occurred during the button pairing phase in the Zigbee network. So even if the app "can't find the lamp", following the button's indicator light will show that it's connected to something. This is important! So the button has to be on the same network.

  • Further information
  • Reviews
  • FAQ
  • CRI

LED SETTI on top of kitchen cabinet - HELMI TUNNELMA CCT 22W/m

The colour temperature adjustable HELMI TUNNELMA CCT 22W/m strip set is perfect for every kitchen or utility room. At the touch of a button you can choose your preferred shade between 2500-6500K.

Includes

The temperature adjustable HELMI TUNNELMA CCT 22W/m ribbon for kitchen cabinets includes:

  • 5 meters of 22W/m CCT led strip, 120 LEDs/m
  • a suitable power supply including a wireless Zigbee receiver
  • VaLO Zigbee series wireless push button (the button can be placed on the wall or kept detached, optional)
  • two surface-mountable aluminium profiles (length 2,5m per profile). Choice of several profiles.
  • 5 m 3-pole cable and 2 quick connectors (optional)

About

The luminous intensity of the 22/m tape is 822 lumens per metre. The base colour of the ribbon is white, but you won't see it, as it is always mounted on the aluminium profile that is always included and the 3M special tape on the LED ribbon ensures a good fixing to the profile. The led strip is 3mm thick, so very unobtrusive. The colour rendering of the Led strip is excellent at CRI93.

Then there is the nasty bit, namely the corners and extensions. You see, the strip only has 15cm wires at each end as standard, so by cutting it at the relevant point (every 5cm), you get two strips. So if you want to cut more, you have to connect new wires to the copper points at the cut-off point. The CCT adjustable led strip uses three (3) pole wires: +, warm and cold. Package includes 5 feet of 3-pole cord and quick connectors to extend the cord to the transformer.

The included transformer is also a Zigbee 3.0 receiver. This means you can connect the transformer to your smart home and control it with a Philips HUE or Smartthings system, for example. The transformer has screw connectors at both ends, so you can plug it in with a fixed or plug-in connector (included!) and the connectors can accommodate two wires from different LED strips. Product description of the transformer

The wireless push button comes with a 3V battery and will last 1-3 years, depending on use. The button fits all frames using the 55m standard seamlessly.

Installation

The ribbon should be bonded to metal, such as an aluminium profile (supplied), to allow heat to dissipate away from the LED circuit. Proper cooling will prolong the life of the LED. Led tape does not bend laterally.

Installation of the strip:

  1. Measure the mounting location
  2. Cut the profiles if necessary (with a scalpel or hacksaw) and the LED strip to the correct length (every 5cm from the cut-off point)
  3. Glue the LED strips to the profile on the table before fixing the profiles and press the covers into place.
  4. Screw the profile brackets to the bottom of the cabinet. 4-5pcs / 2,5m and snap the profiles on.
  5. Run the wires from the led strip to the transformer (hole in the grommets 7mm) and connect to the screw terminals.
  6. Put the plug in the wall and make a pairing between the button and the transformer.

Pairing the button:

  1. Press the button on top of the transformer four (4) times in a row FAST. The Led strip will flash three times.
  2. Three times (3 LED's) light up three times (three times).Place the button next to the transformer (10cm)
  3. Press the bottom two buttons (S1 and S2) simultaneously for more than 3 seconds. The indicator light flashes rapidly
  4. Hold the button next to the transformer. The pairing takes about 10 seconds. The Led strip flashes three times when the pairing is successful.

Pairing the transformer and the button Philips HUE or other Zigbee network:

  1. open "add a light" or similar in your app. The transformer can be found as a new lamp and you can control it with the app.
  2. Press the button on top of the transformer five (5) times in a row FAST. The Led strip will flash three times.
  3. open your app to "add a fixture" or similar.
  4. Press the bottom two buttons (S1 and S2) 3 times in a row.
  5. NOTE! The app will NOT CREATE ANYTHING! But the Green light on the button will flash rapidly 3 times, indicating that it is paired! So the button is connected to the Zigbee network, but it is not configured in the app!
  6. Press the button on top of the transformer 4 times in a row FAST. The Led strip will flash three times.
  7. Place the button next to the transformer (10cm)
  8. Press the bottom two buttons (S1 and S2) simultaneously for more than 3 seconds. The indicator light flashes rapidly
  9. Hold the button next to the transformer. The pairing takes about 10 seconds. The Led strip flashes three times when the pairing is successful.
  10. You can control from the button AND from the app

If after the button pairing phase you can no longer control from the application, an error has occurred during the button pairing phase in the Zigbee network. So even if the app "can't find the lamp", following the button's indicator light will show that it's connected to something. This is important! So the button has to be on the same network.

  • Delivery status In stock at
  • Brand Ledstore
  • Breadcrumbs Home LED lights by areaInterior LED lightingKitchenLighting for kitchen under kitchen cabinet LED SET for the top of the kitchen cabinet - HELMI TUNNELMA CCT 22W/m
  • Category Lighting for kitchen under kitchen cabinet
  • SKU KITCHEN22-SET-CCT-SMD
  • Lumen 822
  • Change Wireless dimmer included in the package
  • Size set is 5m long, can be easily used as 2x2,5m
  • Wattage 110
  • Light control 176
  • Colour rendering (CRI ±3) 93
  • IP class IP44
  • Colour Matte black, Matte white, Grey
  • Guarantee (year) 3 years
  • Life span 35000
  • Approval CE, RoHS
  • Designed in Finland No
New product review

Be the first to write a review!

By rating you will be entered into a prize draw for a €50 gift voucher.

Customer questions
No questions yet.

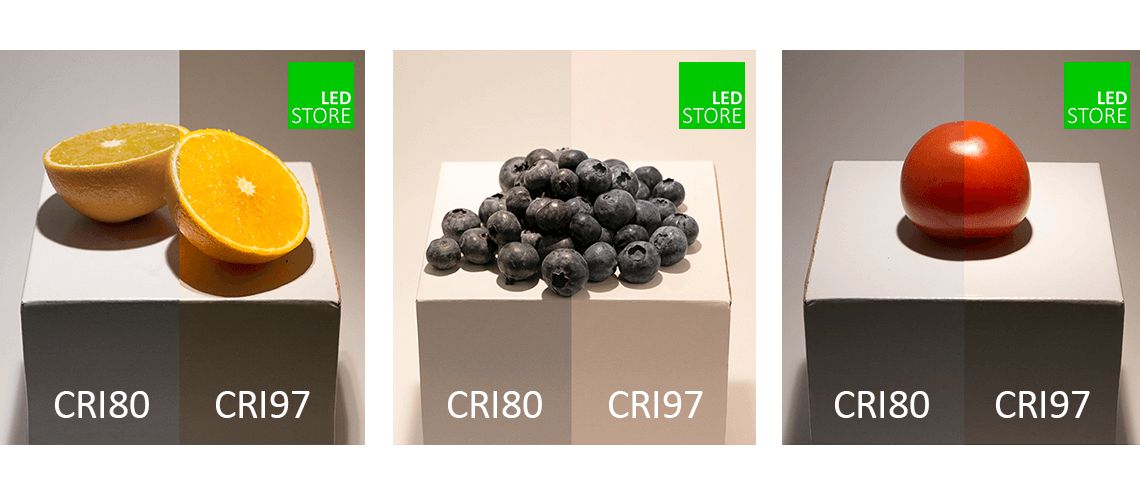
WHAT IS CRI, THE COLOUR RENDERING INDEX

High quality LED lights also have a high colour rendering index, or CRI. A good colour rendering index (CRI) for home use is above 90, and nowadays many market lights are unfortunately closer to 80.

CRI tells you how well an LED light displays colours as they should be. For designers and architects, as well as interior designers, it should be one of the most important considerations. Make sure the lighting is perfect so that your artwork is what it is meant to be.


Colour rendering index

The colour rendering index is expressed as a number on a scale from zero to 100, where 0 = no colour rendering and 100 = full colour rendering. The colour rendering index of LED lights is also known as Ra, which is measured on a smaller scale than CRI. This Ra value does not include red tones or skin tones, for example, so it is a 'glossed' figure for the true quality of an LED light.

RA value

The Ra value measures the reproduction of colours using eight different reference colours. CRI takes into account the wider (15) wavelength range, including reds and other warm colours.


The Ra value is calculated by cutting the wavelength range, weighting the blue and violet tones, and calculating the weighted average of R numbers 1-8.

Excluded from the Ra value are, for example, the colour rendering of bright reds, yellows and greens, and shades close to skin tone. These are described by R-values between 9 and 15. The following is a picture of a measurement result that easily confuses the consumer.


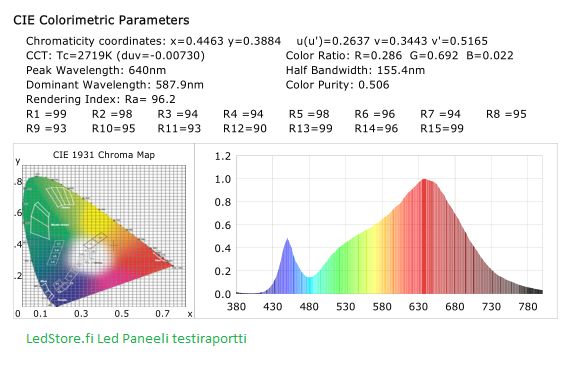
This measurement is from a 9W CCT Led spot

Read more on this topic:

Colour rendering of LEDs - What is the difference between CRI and Ra-value?

loading