LED strip for sauna light set SOLO 7,2 W/m 4000K dimmable
More efficient led strip for sauna with neutral tone dimmable. With this five-metre set, your sauna lighting will be perfect all at once! You can easily divide the strip and profiles into two lengths of up to 2.5 metres.
Sauna lighting
This set includes traditional neutral light for your sauna with a completely spotless SOLO LED strip. With the wireless dimmer, you can conveniently control light that only gets electricity from the wall, but may not even have its own wall switch (renovation sites). Sauna lighting is an important part of the sauna atmosphere.
This is a set for those not afraid of a little work, and you may need to do some soldering if you cut these into more than two pieces.
Products in the set
LED sauna set SOLO 4000K includes:
- 1 roll, 5 metres of 7.2 W/m dots-free SOLO 4000K IP65 led strip
- 1 piece, suitable power supply including wireless Zigbee receiver IP21
- 1 piece, VaLO Zigbee wireless push button (the button can be placed on the wall or kept detached)
- 2 pieces of surface-mounted aluminium profiles with accessories (length 2,5m per profile). Wide range of profiles available
- 5 m of 2-pole low-current cable and 2 sets of lever connectors (2x3 outputs per connector)
- 1 waterproof installation box under the ceiling (optional)
Information from
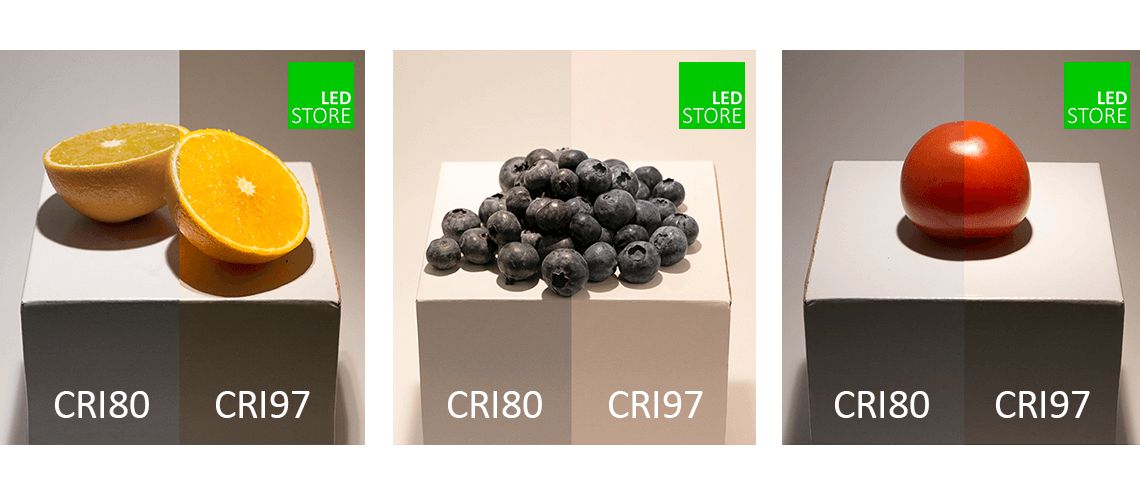
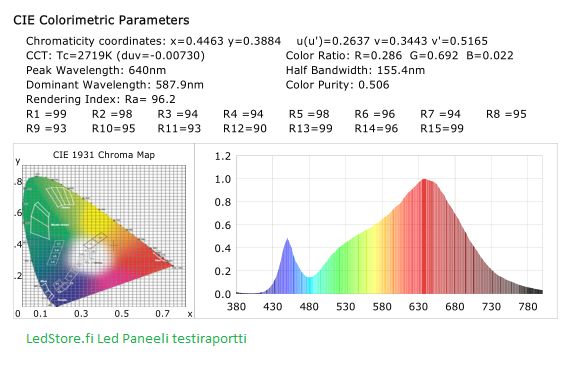
The 7,2/m strip has a light output of +500 lumens per metre, i.e. the basic light output for a typical sauna with light pine or tarred alder materials. The ribbon is always mounted on the supplied aluminium profile and the 3M special tape on the LED ribbon ensures a good fixing to the profile. With this set you get even, spotless light for your sauna. The LED circuit is a COB technology model with a colour rendering index (CRI) of over 95!
What is the difference between COB and SMD LEDs? We wrote about it on our blog.
Then the more difficult part, i.e. the angles and extensions. The ribbon has only 50cm of wires at each end of the roll as standard, so by cutting it at the relevant point (every 5cm), you get two ribbons. To these you can connect, if the installation space allows, the included lever connectors and the wire to the transformer. If you want more than one strip, you will need to solder new wires to the copper points at the cut-off point. The Led strip uses three (2) pole wires + , - . The set comes standard with 5 meters of 2 pole wire and lever connectors to extend the wire to the transformer. Led strip product description
The profile for sauna installation is IP44 from the bottom, i.e. splash-proof and IP65 from the top, something you can safely install it under the ceiling or behind the backrest. With these products you get spotless light in your sauna. Aluminium is also easy to cut with a hacksaw or a wood chipper. The tightness of the plugs at the ends of the profile must also be ensured.
The included transformer is also a Zigbee 3.0 receiver. This means you can connect the transformer to your smart home and control it with, for example, Philips HUE or Smart things. The transformer has screw connectors at both ends, so it's not a plug-in model. The connectors can accommodate two wires from different LED strips. Product description of the transformer.
The wireless push button comes with a button battery (3V) and will last 1-3 years, depending on use. The button comes with its own bezel, but if you want to change it, the button fits all 55m standard bezel seamlessly. For example the Schneider EXXACT furniture series. Product description of the button.
Of course, you can install this led ribbon sauna set in other places than the sauna, such as on the terrace. The only limit is your imagination.
Need help?
If you need help and you want to have the led strip made to your dimensions, our PAJA service can do it.
You can play around with our LediPlan CALCULATOR and competently calculate prices even if it is a kitchen calculator. Just choose the ribbons and profiles of the power and length you want: you can follow the idea of a countertop with an LED ribbon under the ceiling, a ribbon behind the back of the cabinet, etc. The calculator will calculate the right size transformer for you and suggest control options and prices for a ready-to-install package.
We also have an INSTALLATION service for luminaires.
Installation tips
Sauna lighting is installed like any other LED strip installation. The strip should be bonded to metal, such as an aluminium profile (supplied), to allow heat to be conducted away from the LED circuit. Proper cooling will extend the life of the LED. Also, in saunas and other damp areas, wood lives and the adhesive alone on the LED strip will not stay in place for long without the aluminium profile. NOTE! Led strip does not fold laterally, so corners must be cut and soldered with tin pins, or run a separate connecting wire to the transformer for each piece.
Outline of the installation steps for the strip:
1. Measure the installation site.
2. Cut the LED strips to the correct length (every 5cm from the cut-off point).
3. Cut the profiles (with a scalpel or hacksaw), leaving a couple of centimetres extra at the joint.
4. Glue the led strips to the profile on the table before attaching the profiles and press the covers and ends into place.
5. Screw the profile brackets into the mounting location. 4-5pcs brackets / 2,5m and snap the profiles into place.
6. Install the supplied, if purchased, mounting box under the decking. Drill 2 holes underneath (so that the wire does not run water inside) for the wires.
7. Run the wires from the led strip to the transformer (hole in the grommets 7mm) and connect to the screw terminals.
8. The electrician will take care of the mains installation.
9. Make a pairing between the wireless button and the transformer (see below).
10. Enjoy the light!
Pairing the button with the transformer (instructions are also supplied with the products and can be found electronically in the products section)
- Press the button on top of the transformer four (4) times in a row FAST. The Led strip will flash three times.
- Place the button next to the transformer (10cm)
- Press and hold both buttons on the button for 3 seconds. The green indicator light will light up. Immediately afterwards, press the I button twice quickly.
- Hold the button next to the transformer. The pairing takes about 10 seconds. The Led strip flashes three times when the pairing is successful.
Pairing the transformer and button to the Philips HUE bridge or other Zigbee network:
1. Open "add a light" or similar in your app. The Zigbee transformer can be found as a new light that you can control with the app.
2. Press the button on top of the transformer five (5) times in a row FAST. The Led strip will flash three times.
3. Add the button in the same way. In your app, open "add lamp" or similar.
4. Press and hold both buttons of the button for 3 seconds. The green indicator light will light up. Immediately afterwards, press the I button twice quickly.
5. NOTE! The app will NOT DISPLAY A NEW DEVICE, but the green indicator light on the button will flash rapidly three times, indicating that it is paired! So the button is connected to the Zigbee network, but it is not configured in the app!
6. Then pair the transformer and the button: press the button on top of the transformer 4 times in a row FAST. The Led ribbon flashes three times.
7. Click the button on the transformer (less than 10cm) and push the button to the side of the transformer (less than 10cm).
8. Press the bottom two buttons (S1 and S2) simultaneously for more than 3 seconds. The indicator light flashes rapidly.
9. Hold the button next to the transformer. The pairing takes about 10 seconds. The Led strip flashes three times when the pairing is successful.
10. You can now control the lighting from the button AND from the app, with programming and timers enabled.
If after the button pairing phase you can no longer control from the app, an error has occurred during the button pairing phase on the Zigbee network. So even if the app "can't find the lamp", following the button's indicator light will show that it's connected to something. This is important! So the button must be on the same network. If you didn't succeed the first time.. start over from step 1.
What are the options for led strip sauna stoves?
- 3,6W Temperature adjustable CCT dots-free set: for light saunas where mood lighting is desired.
- 7,2W Temperature adjustable CCT Dotless set: for dark saunas or where more light is desired.
- 7,2W 3000K warm spotless ON/OFF set: for dark saunas where you like warm tones. A simpler set.
- 7,2W 3000K warm dimmable set without dots: for dark saunas where warm tones are preferred. Wireless control.
- 7,2W 4000K Neutral Dimmable ON/OFF set: for dark saunas where cool tones are preferred. A simpler set.